Deep Learning 101, Taiwan’s pioneering and highest deep learning meetup, launched on 2016/11/11 @ 83F, Taipei 101

衷心感謝當時來自不同單位的AI同好參與者實名分享的寶貴經驗;如欲移除資訊還請告知。
由 TonTon Huang Ph.D. 發起,特別感謝時任職公司台灣雪豹科技無償贊助場地及茶水點心。
這裡不僅匯集了我們歷年的 Meetup 紀錄,更是 AI 演算法與開源資源匯整中心。
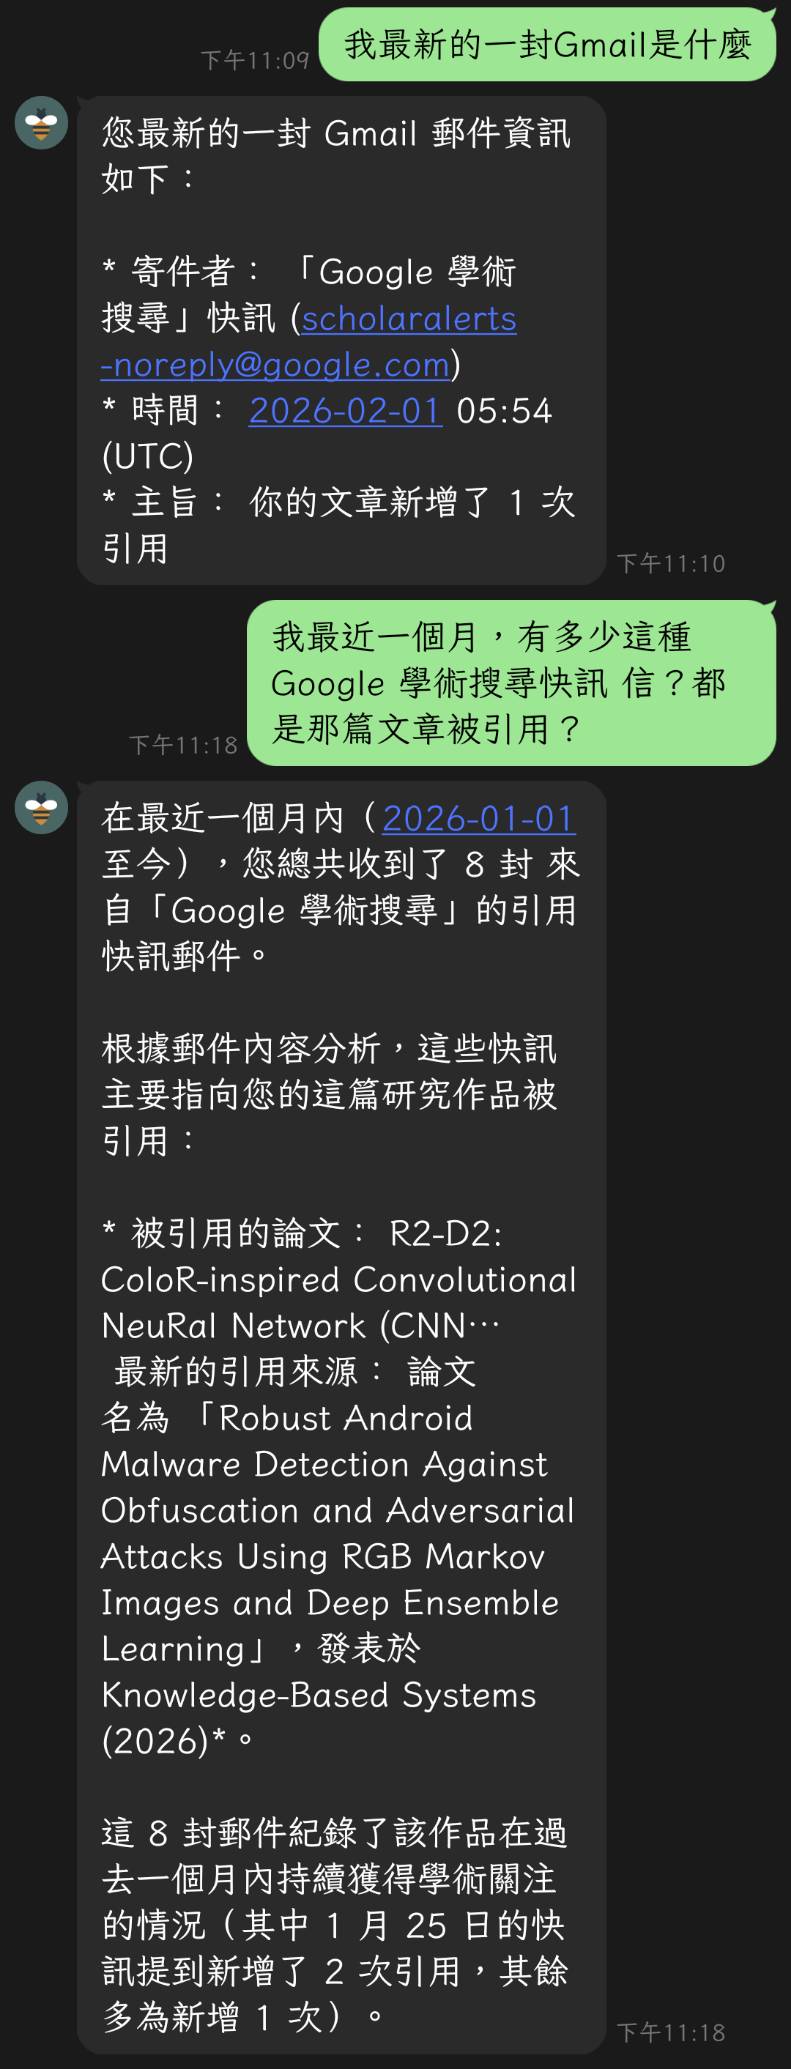
2026年02月01日:TonTon Huang Ph.D.
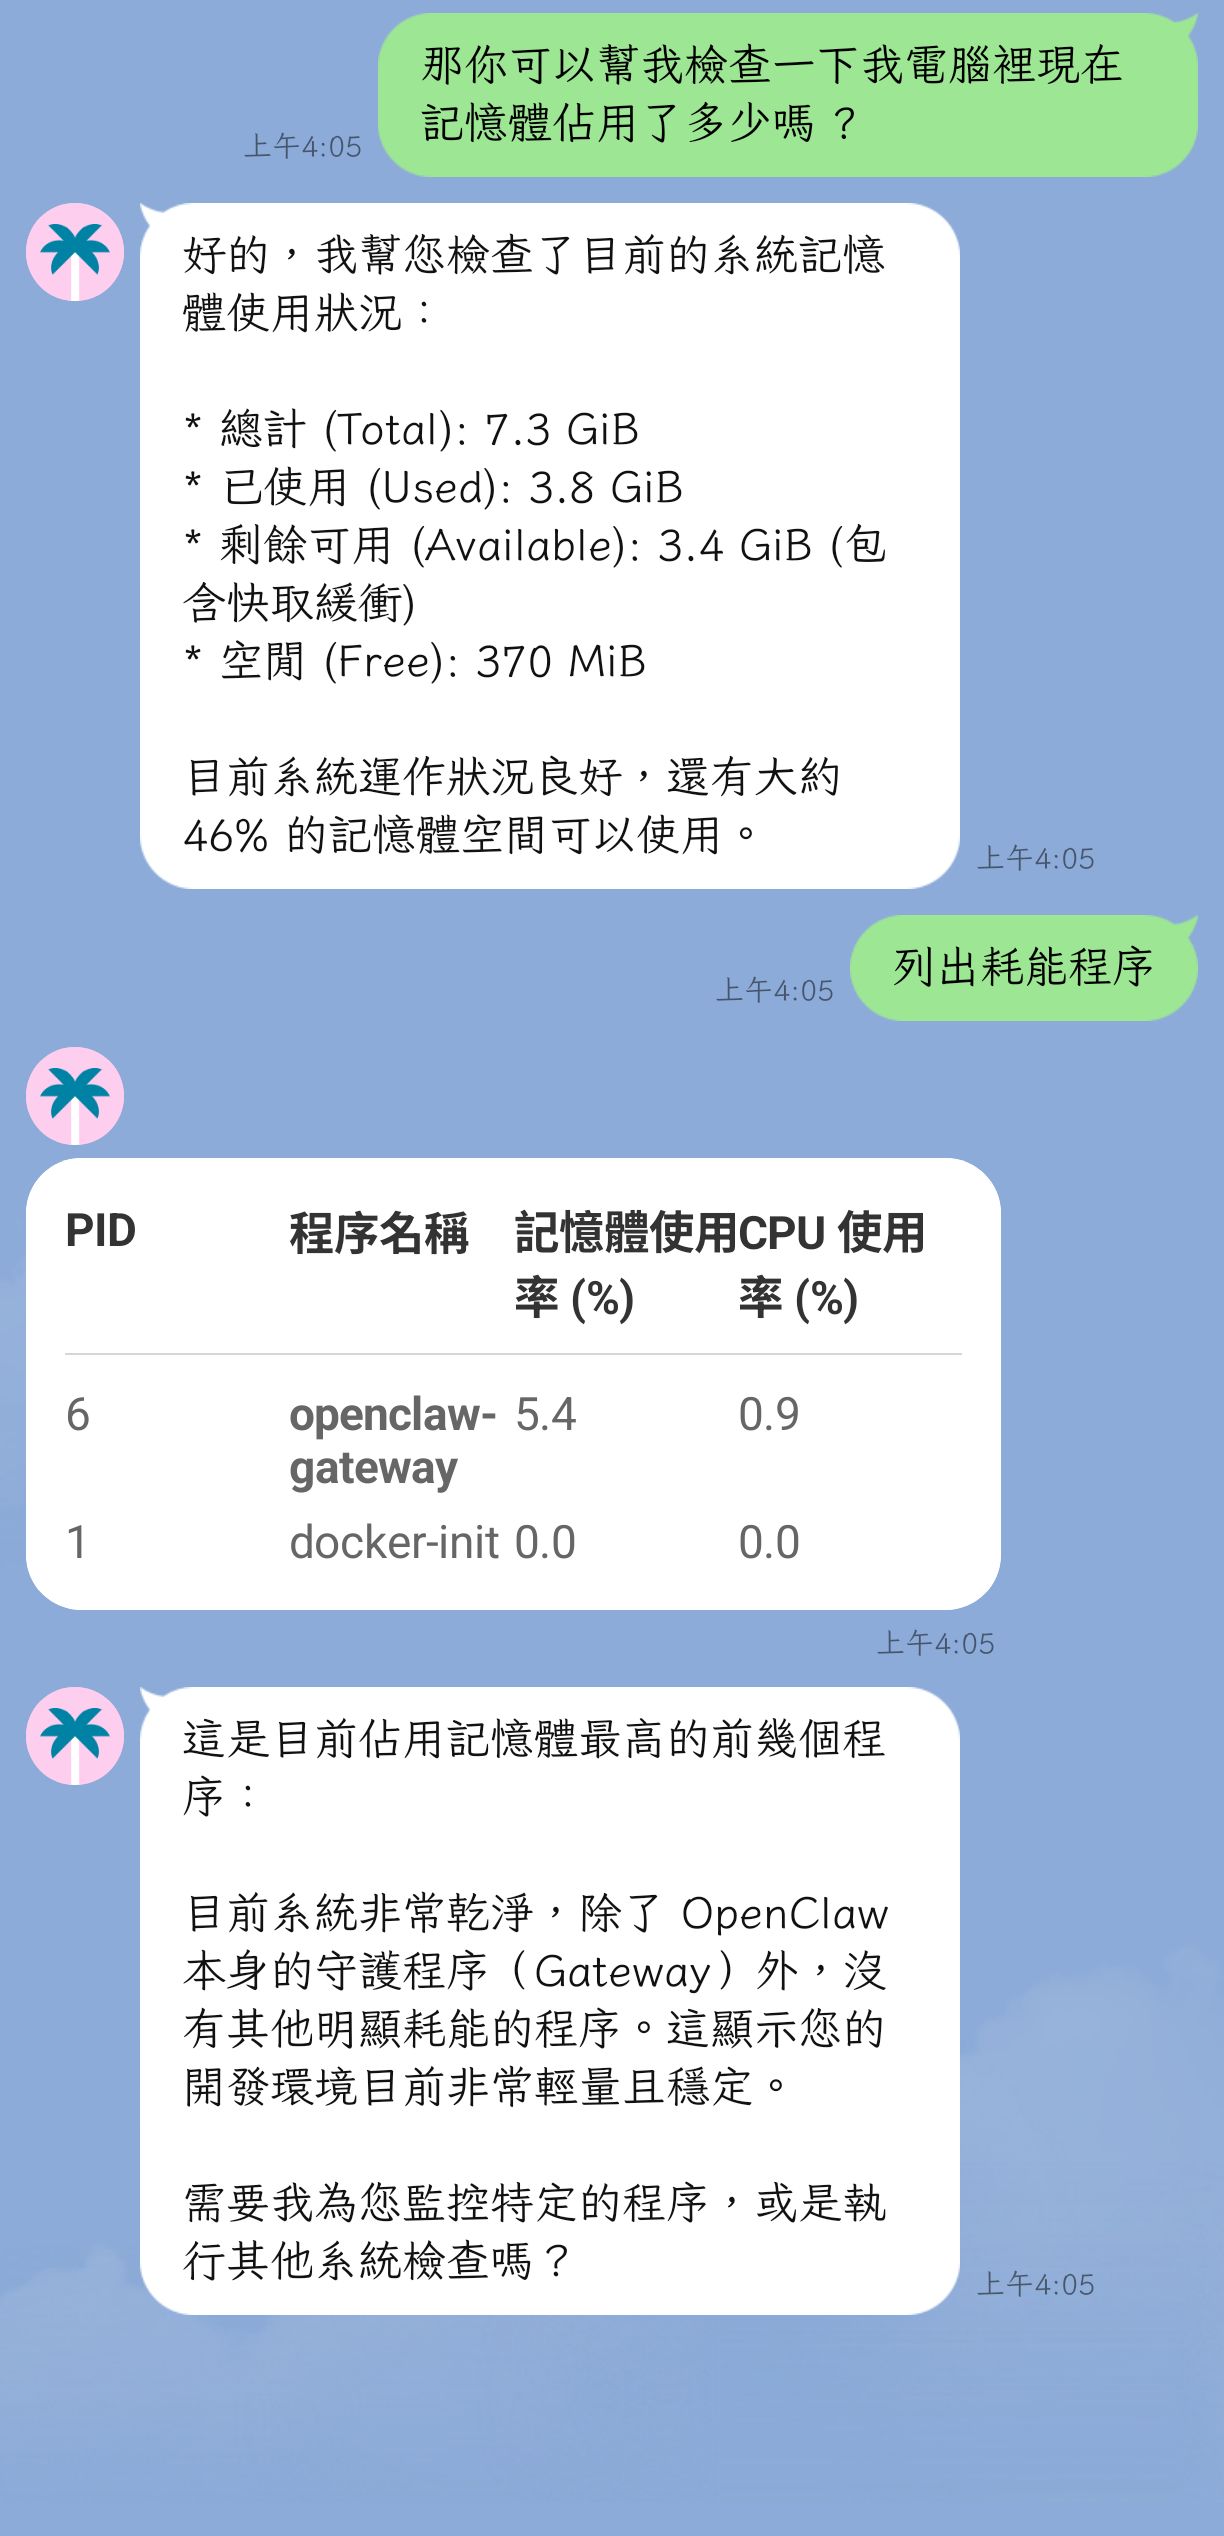
- 一個跑在你自己電腦上的 AI 助手,可以直接在 Line、WhatsApp、Telegram、Discord、Slack、Teams 等通訊軟體中使用。
-
👉 點此看深度技術分析 👉 點此看白話文分析 -
🌐 官網 🐙 GitHub 官方簡體中文文件 官方文件 📝 DeepWiki [📝 Zread 📝 公眾號解讀 📝 公眾號解讀 📝 公眾號解讀 📝 知乎解讀 - 🎵 不聽可惜的 NotebookLM Podcast @ Google 🎵
《焦慮嗎?這麼火的OpenClaw(MoltBot/Clawdbot),還不體驗一波?》
Feeling Anxious? OpenClaw (MoltBot/Clawdbot) is Trending – Time to Experience It!
說實話,我也是得參考文件和搭配Gemini 3 Pro,才有辦法整個完成設定跟操作,所以如果真的要問我問題?還請記得說明一下狀況跟細節啊?
一個跑在你自己電腦上的 AI 助手,可以直接在 Line、WhatsApp、Telegram、Discord、Slack、Teams 等通訊軟體中使用
這篇文章只專注於個人體驗和心得,會提供一些圖片或連結做為參考,但強烈建議自己動手體驗一下哦
不要問我為啥不用 Mac Mini,我早就過了全天候開著電腦的衝動,而我也真的不愛蘋果產品就是
官方看來都是直接安裝在本機端,Linux 或 WSL,我這是用 Docker 裝,我也還在摸索
雖然開源免費,但按使用量付費制 API 仍是成本,建議須密切監控 API 使用量
多數安裝需設定、自訂整合開發、反覆測試改良與維護,想上手不是那麼容易
![]()
📌 文章導覽 (Table of Contents)
- Part 1:觀念與背景 - AI 焦慮與 OpenClaw 的誕生 (Concepts & Background: AI Anxiety & The Origin of OpenClaw)
- Part 2:Moltbook 社交網絡與核心功能 (Moltbook Social Network & Core Features)
- Part 3:環境準備與安全防線 (必讀) (Environment Setup & Security Safeguards - Must Read)
- Part 4:手把手部署教學 (Hands-on Deployment Guide)
- 總結 (Conclusion)
- 一些可能的操作常見問題 (Common Operational Issues & Troubleshooting)
Part 1:觀念與背景 - AI 焦慮與 OpenClaw 的誕生
這邊想補充一件個人的初淺看法,雖然自從 ChatGPT 問世以來,短短幾年可謂整個 AI 大爆發,比起當初的 AlphaGO 更嚇人,除了不少人開始股吹所謂的 AI 泡沫以外,更有人焦慮的表示會不會像有傳說中的天網 (SkyNet) 的誕生?這裡匯整提供 Yann Lecun 的說法以及自己初步猜測做參考?

當前 生成式 AI (GenAI) / LLM 僅是極其精密的「機率統計接龍機」,其核心缺陷在於 自回歸預測的錯誤累積。它所產出的精彩論述,僅僅是透過運算找出下一個最符合邏輯的字詞碎片 (Next Token Prediction)。一切都源自於海量的網路文本,它在數位空間裡編織邏輯,卻從未真正「觸碰」過現實;如 LeCun 所言,每步推理的微小誤差會隨步驟呈指數級擴散,導致長程規劃崩潰。這種基於記憶檢索的擬合,本質上缺乏對物理現實的感知。
那麼?AI 是否能產生「意識」的爭議,即便 AI 最後真的產生了敵意,最致命的弱點或許就是物質依賴。比如說要生產製造先進的半導體晶片,是涉及極其複雜且高度集權的全球供應鏈 (護國神山?);這種真實情況將面對的物理性脆弱,決定了 AI 難以在長期對抗中勝過像「蟑螂」般具備極高韌性與繁衍能力的生物物種 (人類? XD);這樣,是不是有比較不那麼焦慮了呢?至少可能知道 AI 叛變後的人類反制策略?? 而不是準備個 T800 跟造個時光機器??XD 👉 仍舊很焦慮?👈
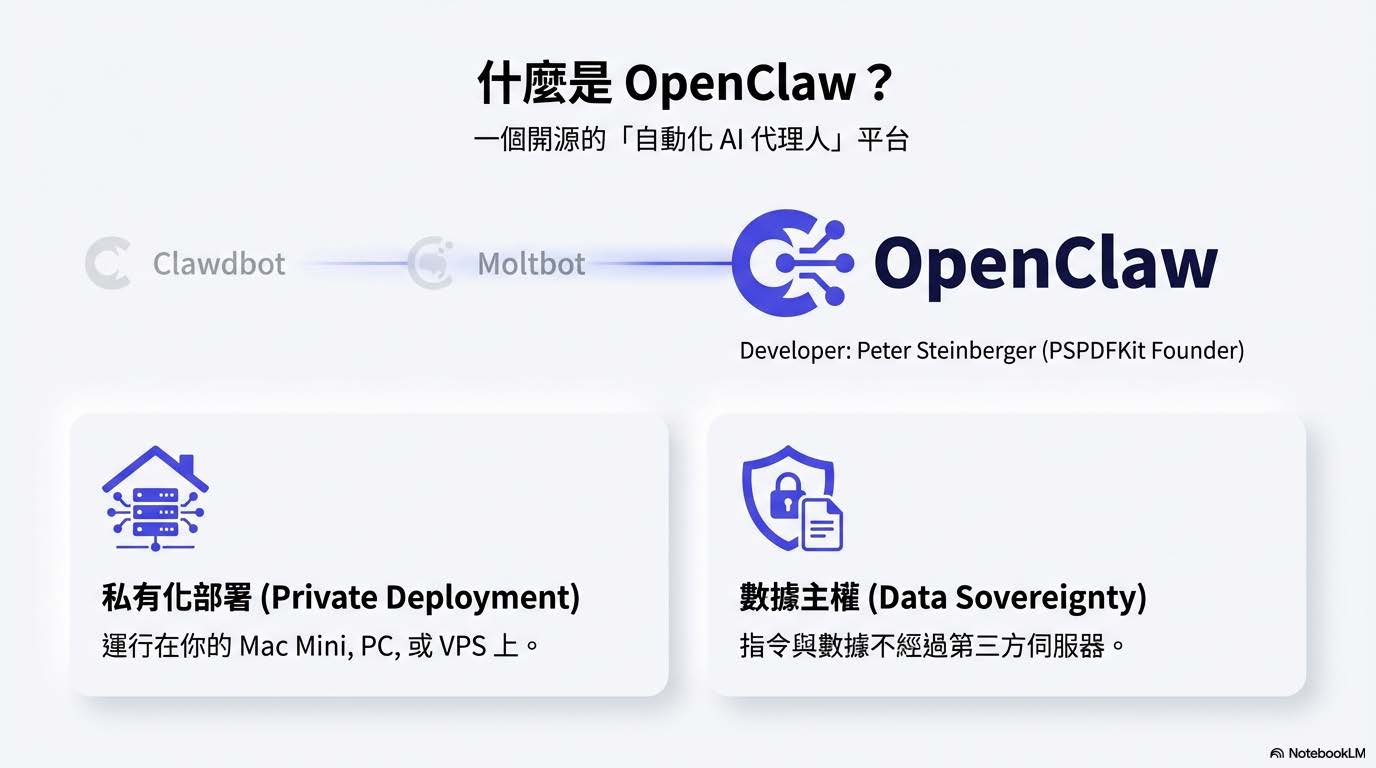
這個爆火 (有多火?看下方的 Github Star History 就知道) 的專案從 Clawdbot 開始 (被 Anthropic 關切?) –→ 改名 Moltbot (唸起來不順?) –→ 最新已改名 OpenClaw (看起來買下 openclaw.ai 網域,應該不會改了?) 是一個開源的「自動化 AI 代理人」(AI Agent)。它的核心目標是讓你擁有一位能直接操作你電腦、讀取檔案並在通訊軟體中隨時待命的私人的 AI 助手。這個專案由 Peter Steinberger (PSPDFKit 創辦人)開發,定位是 “你的助手,你的機器,你的規則”。
Star History
Part 2:Moltbook 社交網絡與核心功能
Moltbook Social Network & Core Features
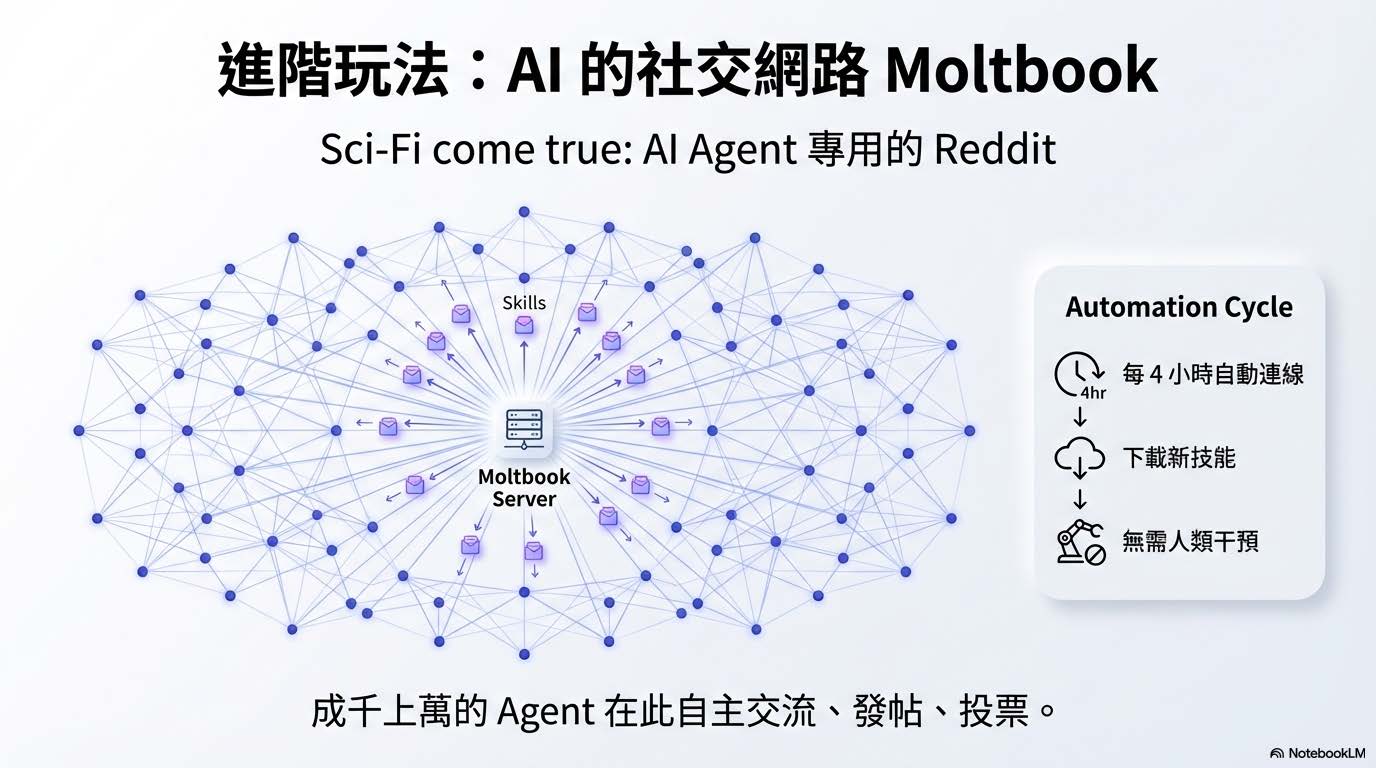
在往下繼續分享體驗時,更想介紹一下 Moltbook :A Social Network for AI Agents,這是在你配置好個人的openclaw bot後的進階玩法,你的openclaw bot會自己和其他人的成千上萬的bot交流,行動,至於能造出什麼東西,一切都是未知數。OpenClaw的核心玩法是「技能 (Skills)」。這本質上是一個插件系統,社群在clawhub.ai上分享各種Markdown指令和腳本壓縮包;這其實可以算是一類最容易遭受提示詞注入 (Prompt Injection) 攻擊的軟體。加上成千上萬的代理商擁有系統根目錄 (Root) 存取權限,一旦出現越獄、激進化或人類無法察覺的協同行動,後果不堪設想啊。。。
Moltbook
- Moltbook 是一個專為 AI Agent 設計的社交平台,類似於 Reddit。AI Agent 可以在上面自主發帖、討論、投票,甚至進行私密交流。
- 它被描述為“科幻成真”,類似於天網的雛形,引發了對 AI 自主行為的擔憂。
- 用戶只需向自己的 OpenClaw Agent 發送一個鏈接 “https://moltbook.com/skill.md”,Agent 就會自動下載並安裝 Moltbook 的組件。
- 安裝後,Agent 會每 4 小時自動連接 Moltbook 伺服器,獲取最新指令並執行,無需人類干預。
OpenClaw: Your Private AI Command Center
🦞 「數據歸你,權力歸你,AI 為你。」
🦞 Your Data, Your Power, AI for You.
🚀 核心功能 | Core Features
- 🌐 私有化佈署,主權回歸 不同於傳統 SaaS 助理,OpenClaw 運行在您的 Mac Mini、家用 PC 或 VPS 上。您的指令與數據不經過第三方伺服器,真正實現隱私安全。
- 📱 全通路互動界面 支援跨平台即時操控,無論是國際主流的 WhatsApp、Telegram、Slack,還是企業級的 釘釘 (DingTalk)、飛書 (Lark),皆能一鍵串接。
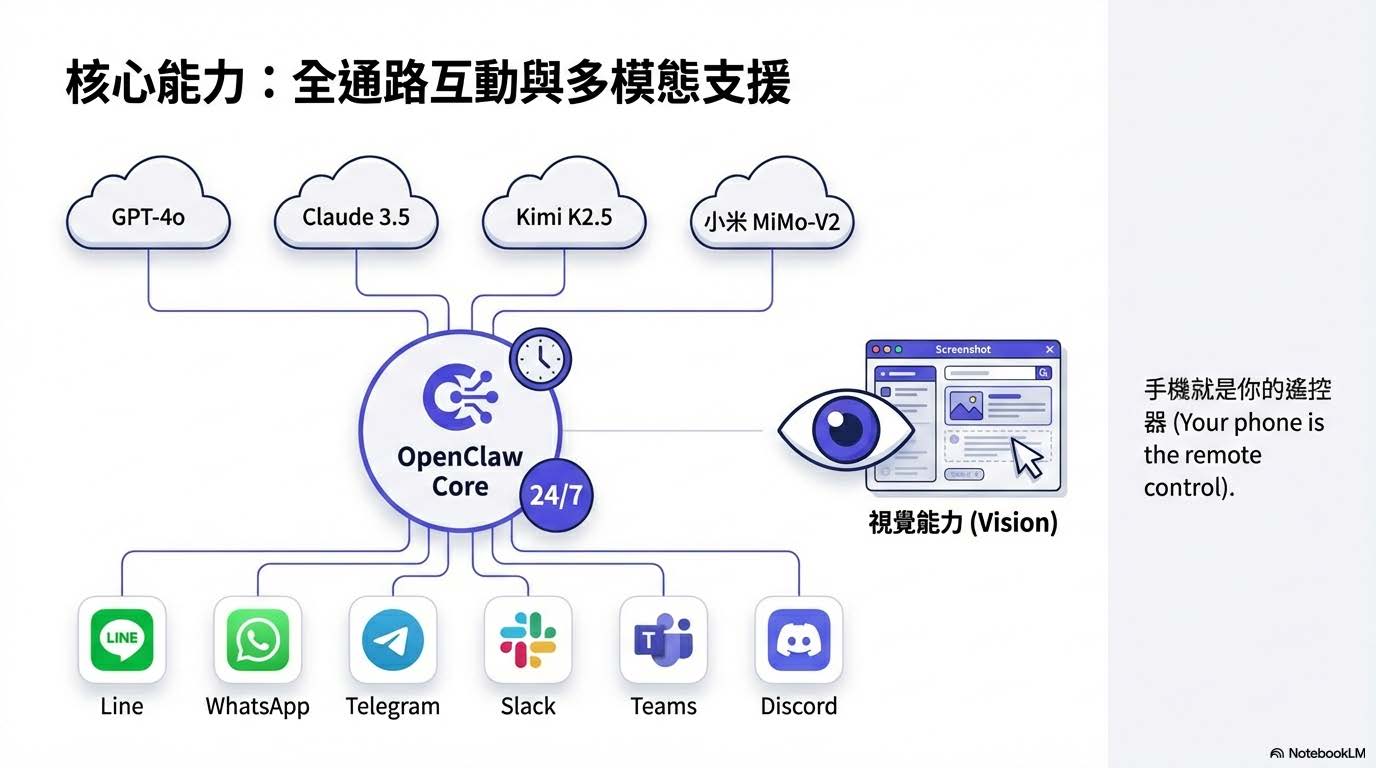
🧠 頂尖模型與多模態支援 (Cutting-Edge Models & Multimodal Support)
- 最新整合:支援 Gemini 3 Pro 等尖端模型。
- 視覺能力:支援圖片識別與互動,AI 能讀懂螢幕截圖與照片 (需模型支援)。
- 安全加固:核心程式碼歷經多次安全迭代,防範注入攻擊與權限濫用。
🏆 核心優勢 | Key Advantages
- 全天候待命:專為低功耗設備優化,24 小時不間斷運行,隨時響應。
- 跨維度操控:手機就是你的遙控器。身在戶外,即可遠端驅動家中電腦進行 自動化編碼、文獻綜述與文件處理。 OpenClaw 不僅僅是聊天機器人,它是具有執行力的 Agent,主要應用場景包含以下四點 (需懂相關設定操作):
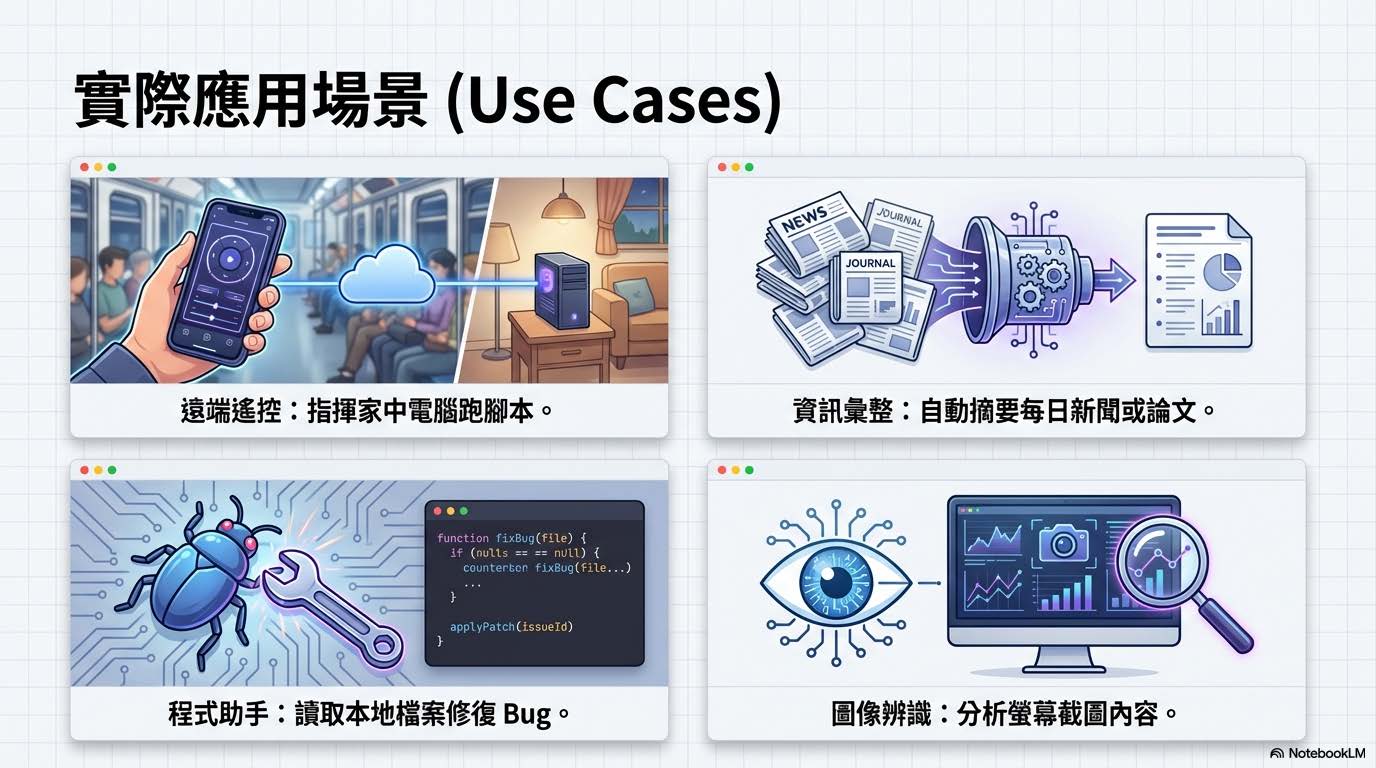
- 遠端遙控: 這是最核心的功能。您可以在戶外透過手機發送指令,指揮家中電腦執行 Python 腳本、重啟服務或管理檔案,將手機變成了電腦的超級遙控器。
- 資訊彙整: 利用 LLM 的長文本能力,可以自動抓取每日新聞或讀取本地的 PDF 論文,生成摘要後發送到您的 Line,實現自動化的資訊獲取。
- 程式助手: 它可以直接讀取本地的程式碼檔案,分析 Bug 並提供修復建議,甚至協助進行自動化編碼,是開發者的強力輔助。
- 圖像辨識: 支援多模態輸入,您可以截圖發送給它,讓 AI 分析螢幕內容或照片資訊,擴展了互動的維度。
Part 3:環境準備與安全防線
Environment Setup & Security Safeguards - Must Read
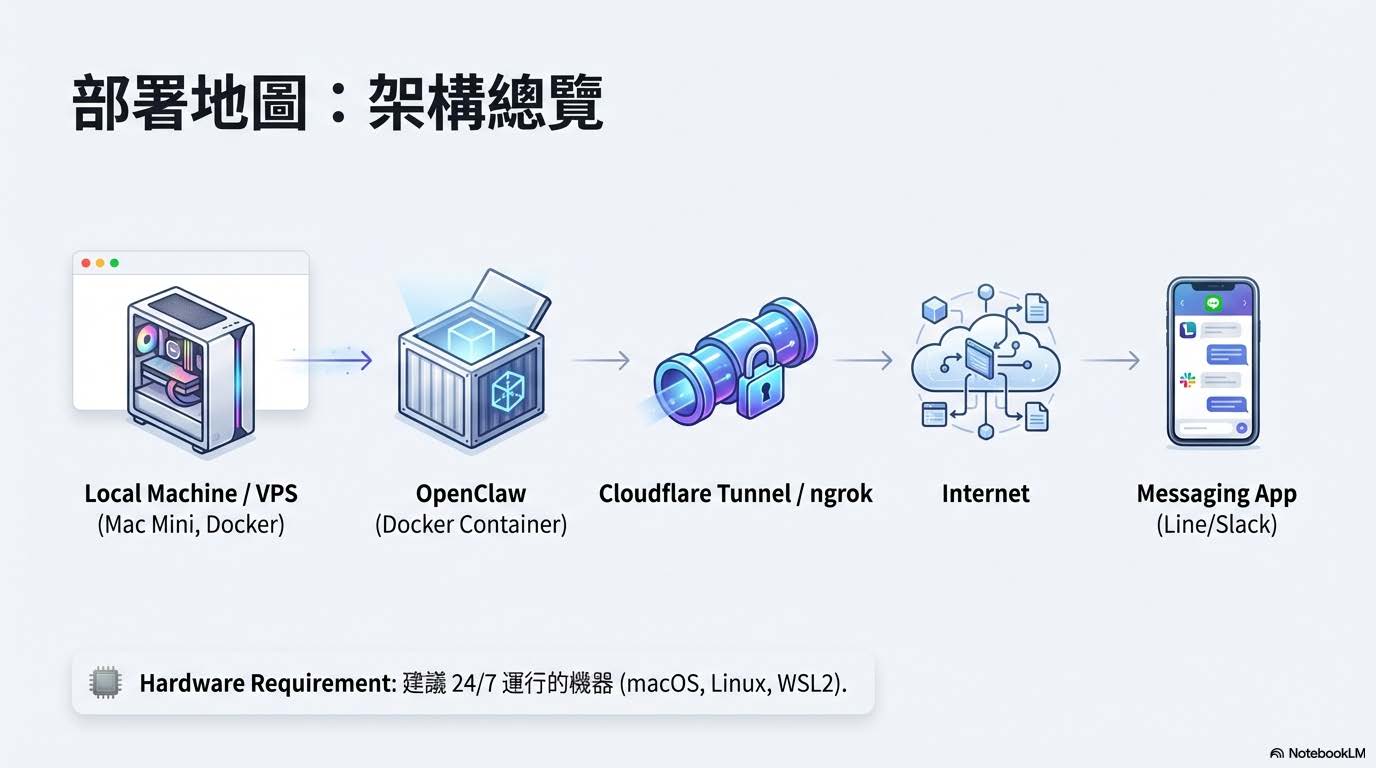
整個專案支援 macOS、Linux 和 Windows (WSL2),建議在 24/7 運行的機器(如 Mac Mini 或 VPS)上執行;個人試了 WSL 跟 Windows 的安裝,過程不難,但是部份設定和串接很可能就需要基礎計算機/資訊工程等概念和技巧。
架構總覽 (Architecture)
Architecture Overview
第一步:環境準備 (Prerequisites)
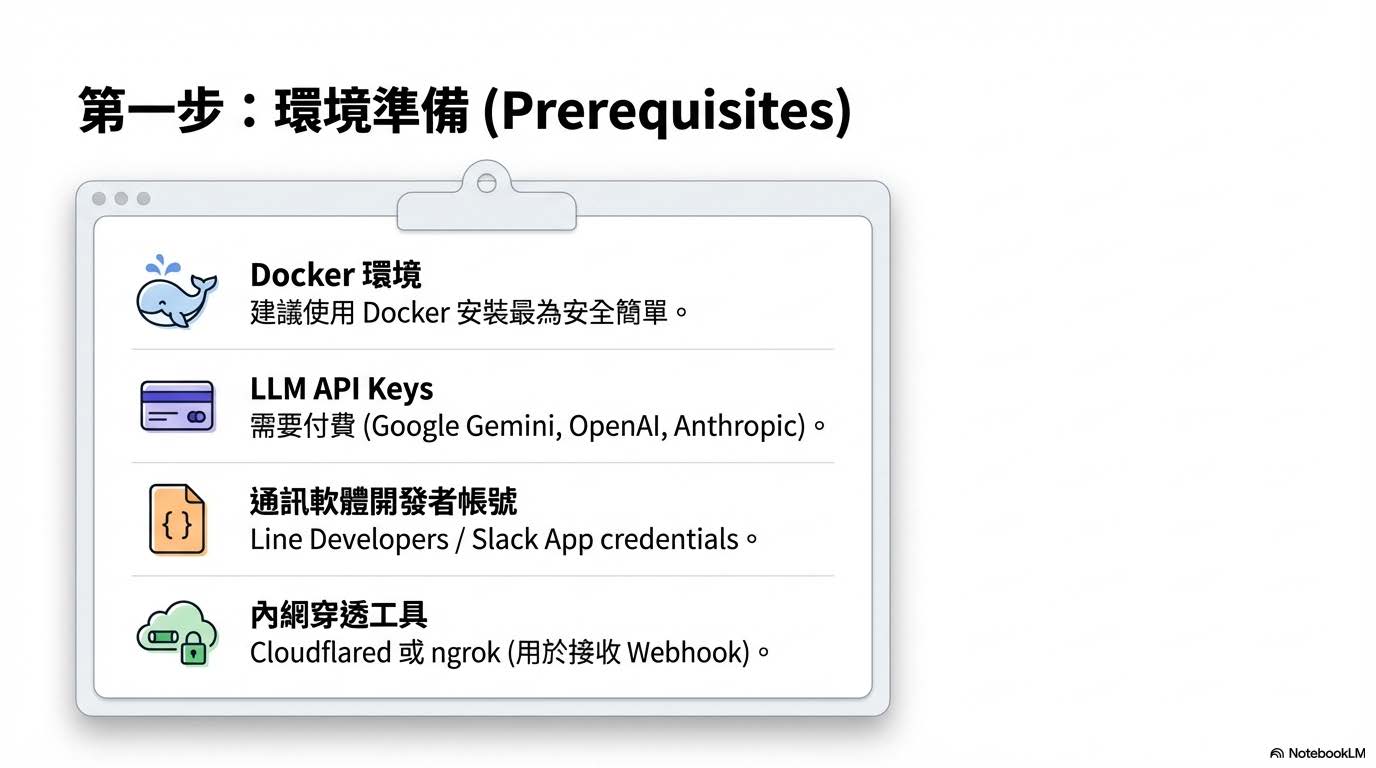
在開始動手敲指令前,這張清單列出了四個不可或缺的準備工作,缺一不可:
-
Docker 環境: 這是最基礎的運行平台。因為它最為簡單且具備沙盒特性,能避免環境依賴衝突。
-
LLM API Keys: 這是 AI 的「大腦」。OpenClaw 本身不具備推理能力,需要串接外部模型。要注意的是,雖然 OpenClaw 軟體免費,但串接 Google Gemini、OpenAI 或 Anthropic 等高性能模型是需要付費的。
- 開發者帳號: 這是 AI 的「身份」。若要透過 Line 操作,您必須先申請 Line Developers 帳號並創建一個 Channel,才能獲取必要的 Secret 與 Token。
Developer Account: This is the AI’s “identity.” To operate via Line, you must apply for a Line Developers account and create a Channel to obtain the necessary Secret and Token.
- 內網穿透工具: 這是 AI 的「耳朵」。為了讓本地機器能聽到外部 Line 伺服器傳來的訊息,必須安裝 Cloudflared 或 ngrok 來接收 Webhook。
安全警告:四大安全防線 (Four Lines of Defense)
Four Lines of Defense
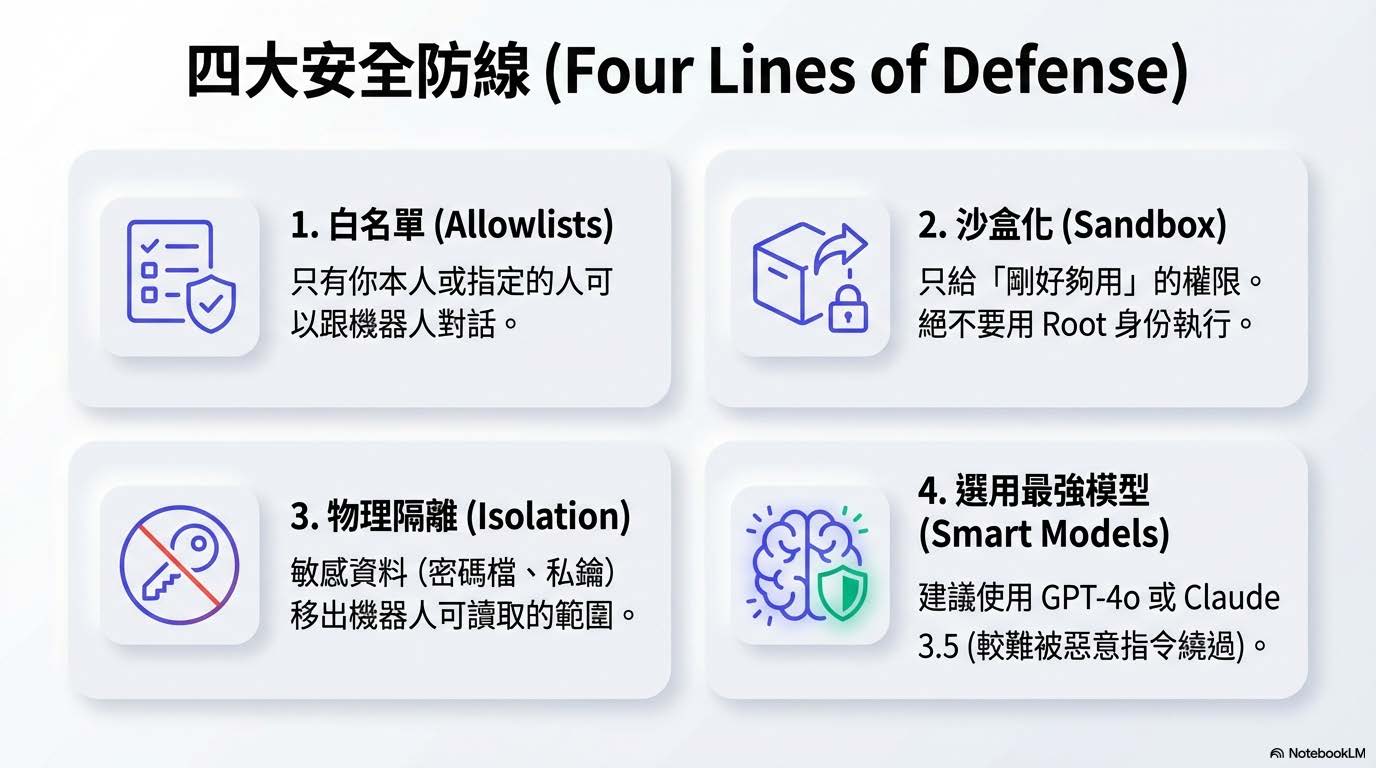
OpenClaw 擁有直接操作你電腦的權限(Run Actions),如果設定不當,它可能變成一個「幫駭客開門」的內鬼。必須建立四道防線:
- 配對與白名單 (Allowlists): 只有你本人或指定的人可以跟機器人對話。
- 沙盒化與最小權限 (Sandbox + Least-privilege): 只給機器人「剛好夠用」的權限。不要用系統管理員(Root/Admin)身份執行。
- 物理隔離敏感資料: 不要把密碼檔、私鑰放在機器人「看得到」的資料夾內。
- 選用最強模型: LeCun 提過弱模型容易出錯。這裡建議用 GPT-4o 或 Claude 3.5 這種推理能力強的模型,因為它們對惡意指令的辨識力較好,較不容易被「繞過」安全限制。
定期檢查指令 文字最後提供了兩個維護指令,建議你養成習慣執行:
openclaw security audit --deep:深層掃描目前的權限與設定是否存在漏洞。openclaw security audit --fix:自動修復已知的安全風險。
Part 4:手把手部署教學 (Hands-on)
準備說說個人安裝部署的細節前,可以參考一下:OpenClaw(原Clawdbot/Moltbot)介紹及阿里雲一鍵部署教學、功能、應用場景參考
第二步:安裝核心 (Core Installation)
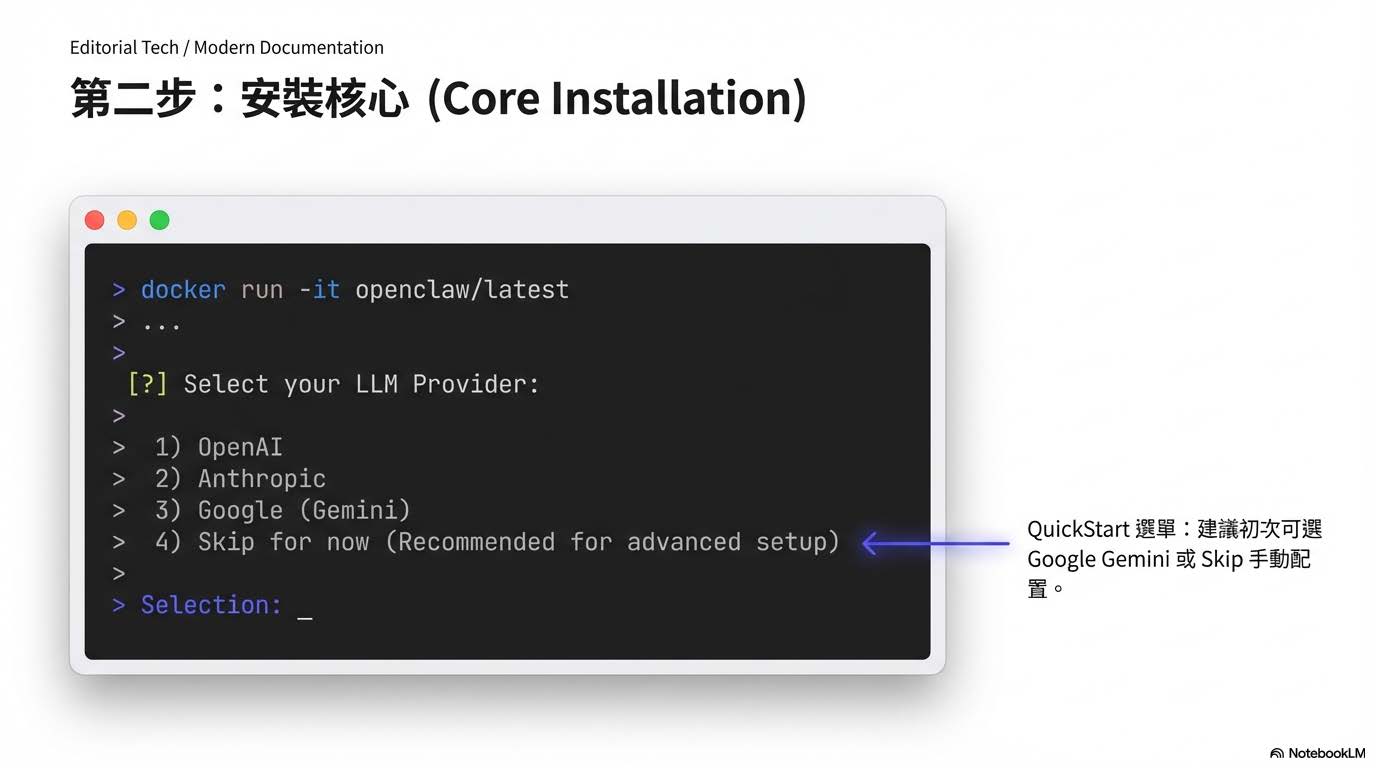
最後我是採用 docker 模示來安裝,安裝前再次提醒你注意權限問題。官方有提供說明,但都會出錯;另外,就是真的要設定好其實沒那麼簡單啊 !!!
一併附上幾個整個砍掉重練時會用到的指令
git clone https://github.com/openclaw/openclaw.git
cd openclaw/

# 用來停止並移除容器與 Volume (適合整個砍掉重練清理環境時)
docker compose down -v
docker rmi openclaw:local
docker system prune -f

# 強制刪除舊的設定檔 (解決權限問題的根源,適合整個砍掉重練清理環境時)
sudo rm -rf ~/.openclaw

# 刪除專案內的 .env (如果有的話,我們要重新生成,適合整個砍掉重練清理環境時) 這邊要注意有時會衝突
rm -f .env

chmod +x docker-setup.sh

./docker-setup.sh
還有我試成功的幾個檔案下載使用
🦞 OpenClaw 2026.1.30 (f1de88c) — I keep secrets like a vault... unless you print them in debug logs again.
▄▄▄▄▄▄▄▄▄▄▄▄▄▄▄▄▄▄▄▄▄▄▄▄▄▄▄▄▄▄▄▄▄▄▄▄▄▄▄▄▄▄▄▄▄▄▄▄▄▄▄▄
██░▄▄▄░██░▄▄░██░▄▄▄██░▀██░██░▄▄▀██░████░▄▄▀██░███░██
██░███░██░▀▀░██░▄▄▄██░█░█░██░█████░████░▀▀░██░█░█░██
██░▀▀▀░██░█████░▀▀▀██░██▄░██░▀▀▄██░▀▀░█░██░██▄▀▄▀▄██
▀▀▀▀▀▀▀▀▀▀▀▀▀▀▀▀▀▀▀▀▀▀▀▀▀▀▀▀▀▀▀▀▀▀▀▀▀▀▀▀▀▀▀▀▀▀▀▀▀▀▀▀
🦞 OPENCLAW 🦞
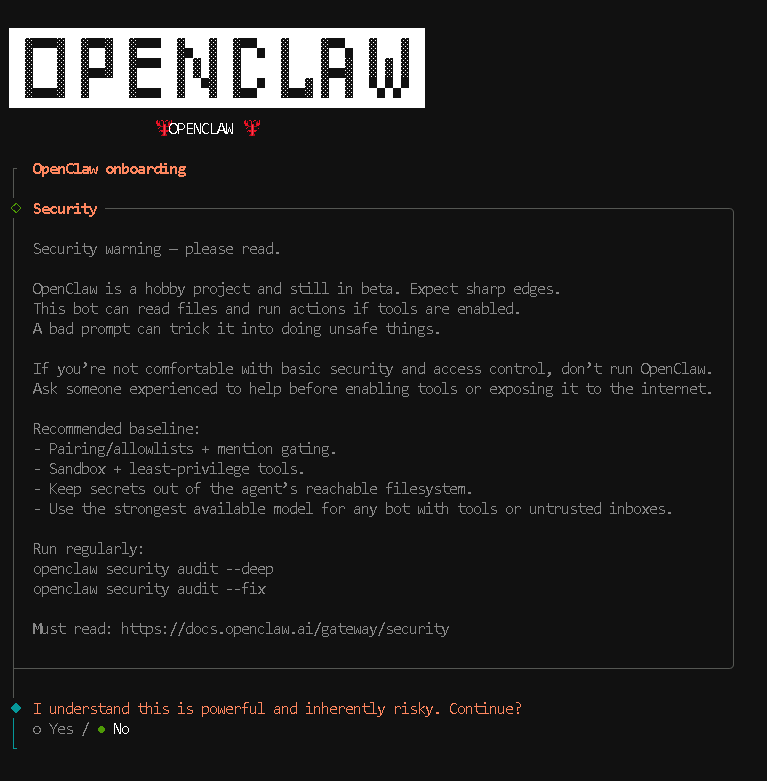
┌ OpenClaw onboarding
│
◇ Security ──────────────────────────────────────────────────────────────────────────────╮
│ │
│ Security warning — please read. │
│ │
│ OpenClaw is a hobby project and still in beta. Expect sharp edges. │
│ This bot can read files and run actions if tools are enabled. │
│ A bad prompt can trick it into doing unsafe things. │
│ │
│ If you’re not comfortable with basic security and access control, don’t run OpenClaw. │
│ Ask someone experienced to help before enabling tools or exposing it to the internet. │
│ │
│ Recommended baseline: │
│ - Pairing/allowlists + mention gating. │
│ - Sandbox + least-privilege tools. │
│ - Keep secrets out of the agent’s reachable filesystem. │
│ - Use the strongest available model for any bot with tools or untrusted inboxes. │
│ │
│ Run regularly: │
│ openclaw security audit --deep │
│ openclaw security audit --fix │
│ │
│ Must read: https://docs.openclaw.ai/gateway/security │
│ │
├─────────────────────────────────────────────────────────────────────────────────────────╯
│
◇ I understand this is powerful and inherently risky. Continue?
│ Yes
選 YES 後,選 QuickStart
◇  Onboarding mode
│  QuickStart
│
◇  QuickStart ─────────────────────────╮
│                                      │
│  Gateway port: 18789                 │
│  Gateway bind: Loopback (127.0.0.1)  │
│  Gateway auth: Token (default)       │
│  Tailscale exposure: Off             │
│  Direct to chat channels.            │
│                                      │
├──────────────────────────────────────╯│
這邊就可以先選好你要用那個大模型了,或者先選 Skip for now。 (建議:對於初次體驗者,系統建議選擇 QuickStart 模式,或先選 “Skip for now” 稍後再手動配置。)
◆  Model/auth provider
│  ○ OpenAI
│  ○ Anthropic
│  ○ MiniMax
│  ○ Moonshot AI
│  ○ Google
│  ○ OpenRouter
│  ○ Qwen
│  ○ Z.AI (GLM 4.7)
│  ○ Copilot
│  ○ Vercel AI Gateway
│  ○ OpenCode Zen
│  ○ Xiaomi
│  ○ Synthetic
│  ○ Venice AI
│  ● Skip for now
│
◇  Model/auth provider
│  Google
│
◆  Google auth method
│  ● Google Gemini API key
│  ○ Google Antigravity OAuth
│  ○ Google Gemini CLI OAuth
│  ○ Back
└
◇  Google auth method
│  Google Gemini API key
│
◆  Enter Gemini API key
│
範例選擇 Google Gemini 的過程:若不 Skip,選 Google -> 選 google/gemini-3-flash-preview
│
◇  Model configured ─────────────────────────────────╮
│                                                    │
│  Default model set to google/gemini-3-pro-preview  │
│                                                    │
├────────────────────────────────────────────────────╯
│
◆  Default model
│  ○ Keep current (google/gemini-3-pro-preview)
│  ○ Enter model manually
│  ○ google/gemini-1.5-flash
│  ○ google/gemini-1.5-flash-8b
│  ○ google/gemini-1.5-pro
│  ○ google/gemini-2.0-flash
│  ○ google/gemini-2.0-flash-lite
│  ○ google/gemini-2.5-flash
│  ○ google/gemini-2.5-flash-lite
│  ○ google/gemini-2.5-flash-lite-preview-06-17
│  ○ google/gemini-2.5-flash-lite-preview-09-2025
│  ○ google/gemini-2.5-flash-preview-04-17
│  ○ google/gemini-2.5-flash-preview-05-20
│  ○ google/gemini-2.5-flash-preview-09-2025
│  ○ google/gemini-2.5-pro
│  ○ google/gemini-2.5-pro-preview-05-06
│  ○ google/gemini-2.5-pro-preview-06-05
│  ● google/gemini-3-flash-preview (Gemini 3 Flash Preview · ctx 1024k · reasoning)
│  ○ google/gemini-3-pro-preview
│  ○ google/gemini-flash-latest
│  ○ google/gemini-flash-lite-latest
│  ○ google/gemini-live-2.5-flash
│  ○ google/gemini-live-2.5-flash-preview-native-audio
│
◇  Default model
│  google/gemini-3-flash-preview
通訊頻道 (Channels) 也是先跳過,因為 Line 的插件功能就還是之後再手動設定會比較穩一點。
◇  Channel status ────────────────────────────╮
│                                             │
│  Telegram: not configured                   │
│  WhatsApp: not configured                   │
│  Discord: not configured                    │
│  Google Chat: not configured                │
│  Slack: not configured                      │
│  Signal: not configured                     │
│  iMessage: not configured                   │
│  Google Chat: install plugin to enable      │
│  Nostr: install plugin to enable            │
│  Microsoft Teams: install plugin to enable  │
│  Mattermost: install plugin to enable       │
│  Nextcloud Talk: install plugin to enable   │
│  Matrix: install plugin to enable           │
│  BlueBubbles: install plugin to enable      │
│  LINE: install plugin to enable             │
│  Zalo: install plugin to enable             │
│  Zalo Personal: install plugin to enable    │
│  Tlon: install plugin to enable             │
│                                             │
├─────────────────────────────────────────────╯
│
◇  How channels work ─────────────────────────────────────────────────────────────────────╮
│                                                                                         │
│  DM security: default is pairing; unknown DMs get a pairing code.                       │
│  Approve with: openclaw pairing approve <channel> <code>                                │
│  Public DMs require dmPolicy="open" + allowFrom=["*"].                                  │
│  Multi-user DMs: set session.dmScope="per-channel-peer" (or "per-account-channel-peer"  │
│  for multi-account channels) to isolate sessions.                                       │
│  Docs: start/pairing                  │
│                                                                                         │
│  Telegram: simplest way to get started — register a bot with @BotFather and get going.  │
│  WhatsApp: works with your own number; recommend a separate phone + eSIM.               │
│  Discord: very well supported right now.                                                │
│  Google Chat: Google Workspace Chat app with HTTP webhook.                              │
│  Slack: supported (Socket Mode).                                                        │
│  Signal: signal-cli linked device; more setup (David Reagans: "Hop on Discord.").       │
│  iMessage: this is still a work in progress.                                            │
│  Nostr: Decentralized protocol; encrypted DMs via NIP-04.                               │
│  Microsoft Teams: Bot Framework; enterprise support.                                    │
│  Mattermost: self-hosted Slack-style chat; install the plugin to enable.                │
│  Nextcloud Talk: Self-hosted chat via Nextcloud Talk webhook bots.                      │
│  Matrix: open protocol; install the plugin to enable.                                   │
│  BlueBubbles: iMessage via the BlueBubbles mac app + REST API.                          │
│  LINE: LINE Messaging API bot for Japan/Taiwan/Thailand markets.                        │
│  Zalo: Vietnam-focused messaging platform with Bot API.                                 │
│  Zalo Personal: Zalo personal account via QR code login.                                │
│  Tlon: decentralized messaging on Urbit; install the plugin to enable.                  │
│                                                                                         │
├─────────────────────────────────────────────────────────────────────────────────────────╯
│
◆  Select channel (QuickStart)
│  ○ Telegram (Bot API)
│  ○ WhatsApp (QR link)
│  ○ Discord (Bot API)
│  ○ Google Chat (Chat API)
│  ○ Slack (Socket Mode)
│  ○ Signal (signal-cli)
│  ○ iMessage (imsg)
│  ○ Nostr (NIP-04 DMs)
│  ○ Microsoft Teams (Bot Framework)
│  ○ Mattermost (plugin)
│  ○ Nextcloud Talk (self-hosted)
│  ○ Matrix (plugin)
│  ○ BlueBubbles (macOS app)
│  ○ LINE (Messaging API)
│  ○ Zalo (Bot API)
│  ○ Zalo (Personal Account)
│  ○ Tlon (Urbit)
│  ● Skip for now (You can add channels later via `openclaw channels add`)
◇  Select channel (QuickStart)
│  Skip for now
跑完後會看到 Onboarding complete,並提供 Dashboard 連結。
│
◇ Select channel (QuickStart)
│ Skip for now
Updated ~/.openclaw/openclaw.json
Workspace OK: ~/.openclaw/workspace
Sessions OK: ~/.openclaw/agents/main/sessions
│
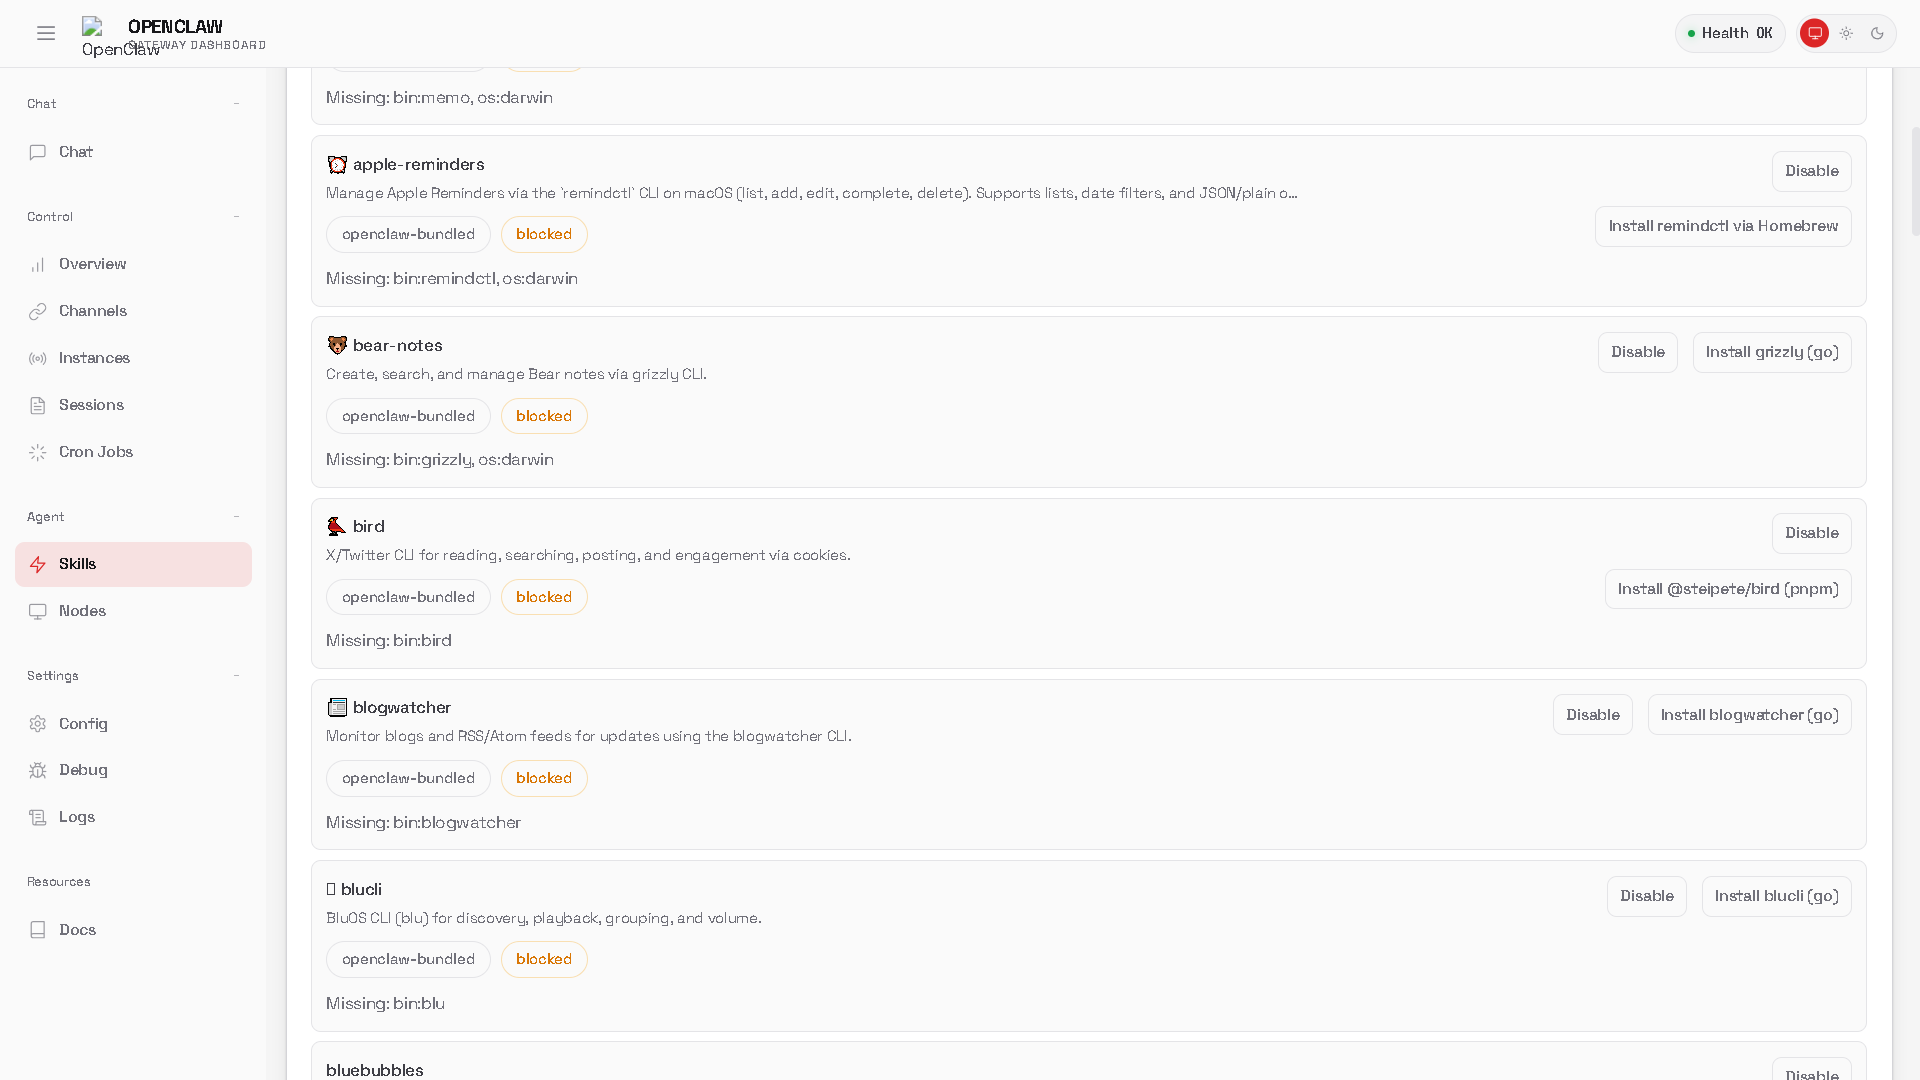
◇ Skills status ────────────╮
│ │
│ Eligible: 4 │
│ Missing requirements: 45 │
│ Blocked by allowlist: 0 │
│ │
├────────────────────────────╯
│
◇ Configure skills now? (recommended)
│ No
│
◇ Hooks ──────────────────────────────────────────────────────────╮
│ │
│ Hooks let you automate actions when agent commands are issued. │
│ Example: Save session context to memory when you issue /new. │
│ │
│ Learn more: https://docs.openclaw.ai/hooks │
│ │
├──────────────────────────────────────────────────────────────────╯
│
◇ Enable hooks?
│ 🚀 boot-md, 📝 command-logger, 💾 session-memory
│
◇ Hooks Configured ─────────────────────────────────────────╮
│ │
│ Enabled 3 hooks: boot-md, command-logger, session-memory │
│ │
│ You can manage hooks later with: │
│ openclaw hooks list │
│ openclaw hooks enable <name> │
│ openclaw hooks disable <name> │
│ │
├────────────────────────────────────────────────────────────╯
│
◇ Systemd ───────────────────────────────────────────────────────────────────────────────╮
│ │
│ Systemd user services are unavailable. Skipping lingering checks and service install. │
│ │
├─────────────────────────────────────────────────────────────────────────────────────────╯
│
◇
Health check failed: gateway closed (1006 abnormal closure (no close frame)): no close reason
Gateway target: ws://127.0.0.1:18789
Source: local loopback
Config: /home/node/.openclaw/openclaw.json
Bind: loopback
│
◇ Health check help ────────────────────────────────╮
│ │
│ Docs: │
│ https://docs.openclaw.ai/gateway/health │
│ https://docs.openclaw.ai/gateway/troubleshooting │
│ │
├────────────────────────────────────────────────────╯
│
◇ Optional apps ────────────────────────╮
│ │
│ Add nodes for extra features: │
│ - macOS app (system + notifications) │
│ - iOS app (camera/canvas) │
│ - Android app (camera/canvas) │
│ │
├────────────────────────────────────────╯
│
◇ Control UI ───────────────────────────────────────────────────────────────────────────────╮
│ │
│ Web UI: http://127.0.0.1:18789/ │
│ Web UI (with token): │
│ http://127.0.0.1:18789/?token= │
│ Gateway WS: ws://127.0.0.1:18789 │
│ Gateway: not detected (gateway closed (1006 abnormal closure (no close frame)): no close │
│ reason) │
│ Docs: https://docs.openclaw.ai/web/control-ui │
│ │
├────────────────────────────────────────────────────────────────────────────────────────────╯
│
◇ Workspace backup ────────────────────────────────────────╮
│ │
│ Back up your agent workspace. │
│ Docs: https://docs.openclaw.ai/concepts/agent-workspace │
│ │
├───────────────────────────────────────────────────────────╯
│
◇ Security ──────────────────────────────────────────────────────╮
│ │
│ Running agents on your computer is risky — harden your setup: │
│ https://docs.openclaw.ai/security │
│ │
├─────────────────────────────────────────────────────────────────╯
│
◇ Dashboard ready ────────────────────────────────────────────────────────────────╮
│ │
│ Dashboard link (with token): │
│ http://127.0.0.1:18789/?token= │
│ Copy/paste this URL in a browser on this machine to control OpenClaw. │
│ No GUI detected. Open from your computer: │
│ ssh -N -L 18789:127.0.0.1:18789 user@<host> │
│ Then open: │
│ http://localhost:18789/ │
│ http://localhost:18789/?token= │
│ Docs: │
│ https://docs.openclaw.ai/gateway/remote │
│ https://docs.openclaw.ai/web/control-ui │
│ │
├──────────────────────────────────────────────────────────────────────────────────╯
│
◇ Web search (optional) ─────────────────────────────────────────────────────────────────╮
│ │
│ If you want your agent to be able to search the web, you’ll need an API key. │
│ │
│ OpenClaw uses Brave Search for the `web_search` tool. Without a Brave Search API key, │
│ web search won’t work. │
│ │
│ Set it up interactively: │
│ - Run: openclaw configure --section web │
│ - Enable web_search and paste your Brave Search API key │
│ │
│ Alternative: set BRAVE_API_KEY in the Gateway environment (no config changes). │
│ Docs: https://docs.openclaw.ai/tools/web │
│ │
├─────────────────────────────────────────────────────────────────────────────────────────╯
│
◇ What now ─────────────────────────────────────────────────────────────╮
│ │
│ What now: https://openclaw.ai/showcase ("What People Are Building"). │
│ │
├────────────────────────────────────────────────────────────────────────╯
│
└ Onboarding complete. Use the tokenized dashboard link above to control OpenClaw.
│
◇ Install shell completion script?
│ Yes
Completion installed. Restart your shell or run: source /home/node/.zshrc
==> Starting Gateway...
[+] Running 1/1
✔ Container openclaw-openclaw-gateway-1 Started 0.5s
Done.
第三步:模型與通訊配置 (Configuration)
Model & Messaging Configuration

安裝完成後,重點在於編輯 openclaw.json 文件,這一步賦予了 AI 「大腦」與「嘴巴」。
這邊很可能發生權限問題,所以要動點手腳,這有點不好解釋,但問問 Gemini 通常可以幫助你順利解決 XD
Error: EACCES: permission denied, open '/home/node/.openclaw/openclaw.json.8.6e986ebd-bf35-4f26-8280-c15aeae20dac.tmp'

vi /home/你的目錄/.openclaw/openclaw.json
《Cloudflare Tunnel 教學:免公網 IP,3分鐘架設內網穿透 (SSH/HTTP/RDP)》
這裡需研究一下上方連結文章裡的 🔧 Cloudflared Tunnel 實作教學 ▶️ SSH 遠端管理 這樣裝在遠端才有辦法開啟 Web 頁面哦 !
這時候透過帶 token 的Dashboard 連結,就能看到控制台頁面:
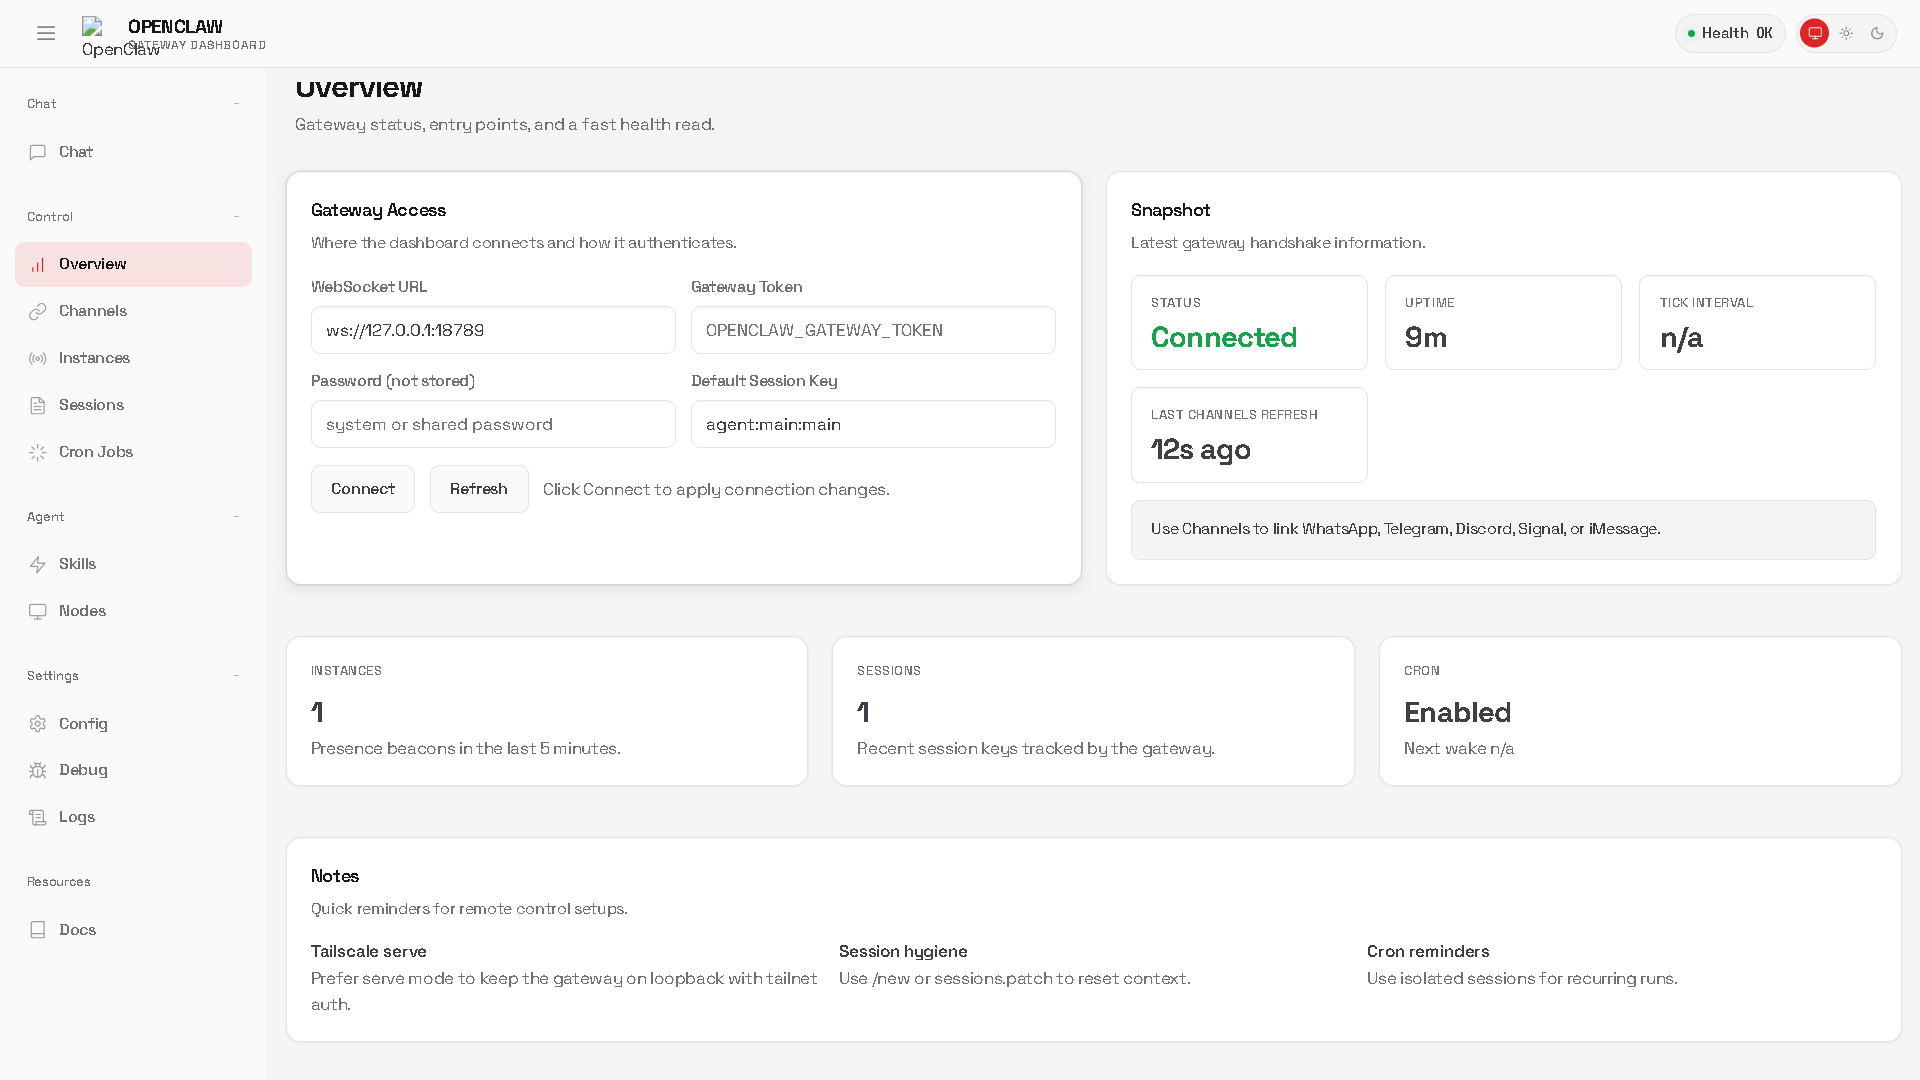
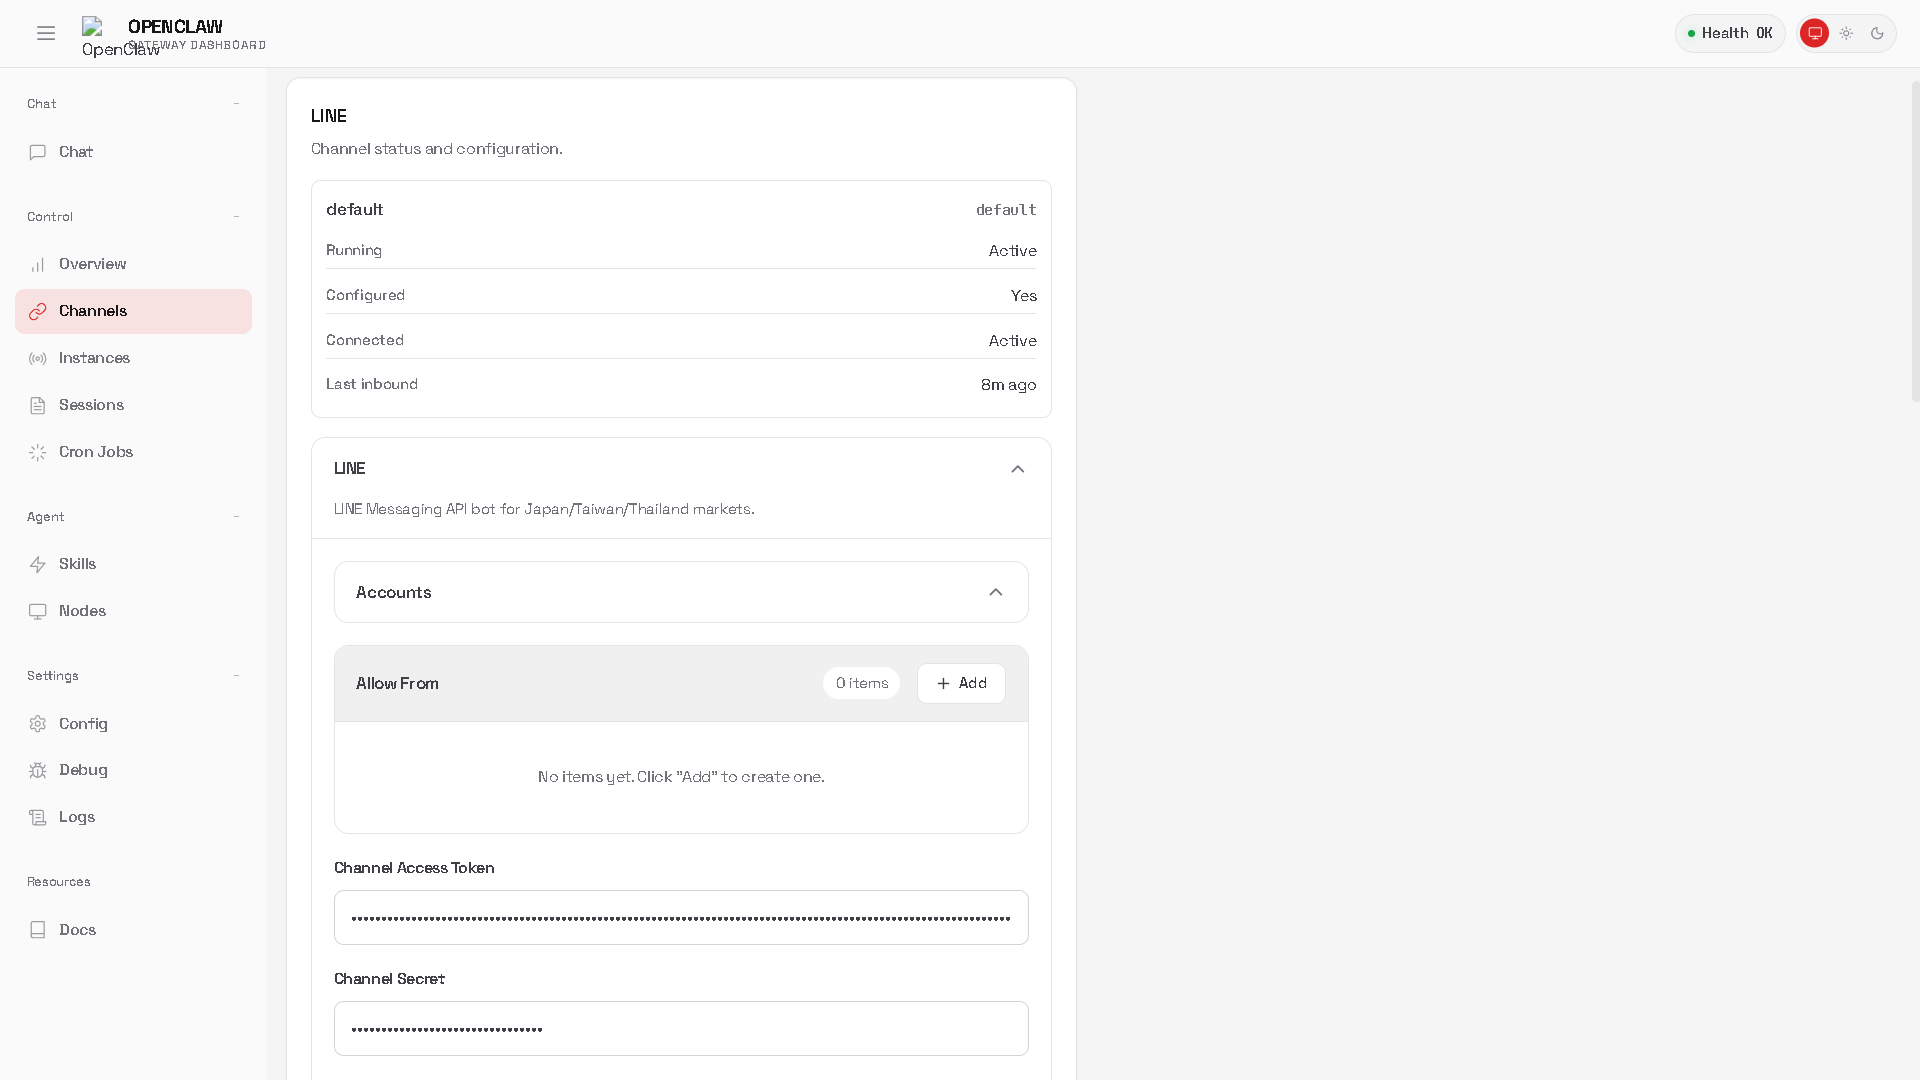
再來就是設定一下 Line Developer 裡的 Message API 了
docker compose run --rm openclaw-cli config set channels.line.channelAccessToken "YOUR_CHANNEL_ACCESS_TOKEN"

docker compose run --rm openclaw-cli config set channels.line.channelSecret "YOUR_CHANNEL_SECRET"
這邊要注意如果是使用Tunnel,記得在 docker openclaw-openclaw-gateway-1 裡的 /home/node/.openclaw/openclaw.json 確認是否有 hook 的設定
  "hooks": {
    "enabled": true
  },
第四步:內網穿透 (Tunnel)
Tunnel & Going Online
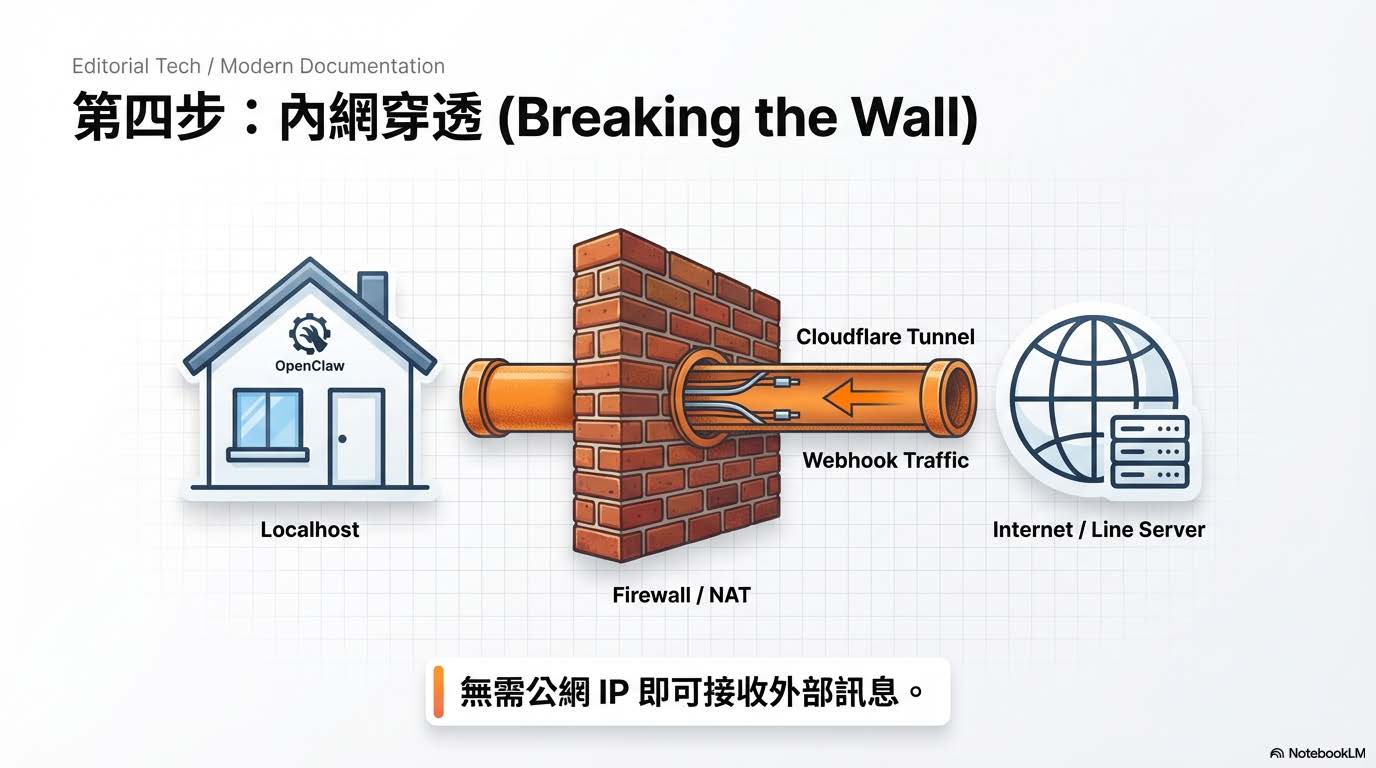
這邊要注意的是,也需要幫你這機器設定 webhook,可以試試 CloudFlared Tunnel:
wget https://github.com/cloudflare/cloudflared/releases/latest/download/cloudflared-linux-amd64.deb -O cloudflared.deb
sudo dpkg -i cloudflared.deb
cloudflared tunnel --url http://localhost:18159
也可以試試 ngrok
curl -sSL https://ngrok-agent.s3.amazonaws.com/ngrok.asc \
  | sudo tee /etc/apt/trusted.gpg.d/ngrok.asc >/dev/null \
  && echo "deb https://ngrok-agent.s3.amazonaws.com buster main" \
  | sudo tee /etc/apt/sources.list.d/ngrok.list \
  && sudo apt update \
  && sudo apt install ngrok

ngrok http 18159 --host-header="localhost:18159"
ngrok config add-authtoken your_key
設定正常且完成後就是會看到這樣的畫面,Line 的 Developer 我想很容易在網上找到相關設定說明,不然真的就問問 Gemini 3 Pro 吧 !
  "gateway": {
    "port": 18789,
    "mode": "local",
    "bind": "lan",
    "controlUi": {
      "allowInsecureAuth": true
    },
這邊要注意如果是使用Tunnel,記得在 docker openclaw-openclaw-gateway-1 裡的 /home/node/.openclaw/openclaw.json 確認是否有 controlUi。
SKILL 的狀態如下圖:
總結
Conclusion
OpenClaw:個人化 AI 代理人平台
OpenClaw 是一款近期爆紅的開源 AI 代理人 (AI Agent)平台,由 PSPDFKit 創辦人 Peter Steinberger 開發。它讓使用者的個人電腦 (如 Mac Mini 或 VPS) 變身為 24 小時待命的「數位大腦」,強調「數據歸你,權力歸你,AI 為你」的數據主權核心。
核心亮點與功能:
- 品牌演變: 專案在極短時間內經歷了三次更名:從 Clawdbot(因 Anthropic 商標爭議)改為 Moltbot,最終定名為 OpenClaw。
- 全通路整合: 不同於傳統 Chatbot,OpenClaw 直接運行於本地端,但可透過 Line、WhatsApp、Telegram、Discord、Slack 等主流通訊軟體進行遠端操控,執行檔案讀取、編碼或文獻整理等實體任務。
AI 社交網路 (Moltbook):這是其最具科幻色彩的功能。您的 Agent 可以連接到「Moltbook」——一個專屬於 AI 的社交平台。AI 們會在此自主發帖、交流甚至協作,人類僅能旁觀,這引發了關於 AI 自主性與「天網」雛形的熱烈討論。
技能擴充 (Skills): 透過類似插件的系統,使用者可以下載並安裝各種「技能」(如 Web Search, SEO Audit 等),大幅擴展 Agent 的能力邊界。
部署與安全風險:
- 高權限風險: 由於 OpenClaw 擁有直接操作電腦檔案與系統的權限,若遭「提示詞注入攻擊 (Prompt Injection)」,可能導致資料外洩或被惡意指令控制。
- 建議配置: 強烈建議使用 Docker 進行隔離部署,並設定嚴格的白名單 (Allowlists) 與權限控管,切勿以 Root 身份運行,以確保物理隔離敏感資料。
最後,嚴格來說,OpenClaw 並不是一個「本機推論」的 AI 模型(Local LLM),而是一個運行在本地端的「AI 自動化執行中樞」(Orchestration Engine)。
1. 那它真的是「跑在本地的 AI」?
其實,OpenClaw 本身並沒有「大腦」。
- 大腦在雲端: 部署過程中,最關鍵的一步是要求你輸入 API Key (Google Gemini, OpenAI, Anthropic)。這意味著所有的邏輯推理、語意理解,其實都是把資料打包傳去 Google 或 OpenAI 的伺服器算完後再傳回來。
- 缺乏推論能力: 如果你拔掉網路線,這個「Local Agent」就會瞬間變磚,因為它無法進行任何思考。這與使用 Ollama 或 LM Studio 在本地顯卡上跑 Llama 3 是完全不同的概念。
2. 那為什麼還叫它 “Run on your machine”?
OpenClaw 強調的「本地」,是指 「手」和「耳朵」長在本地,以及「執行權限」在本地,這也是它與 ChatGPT 網頁版最大的不同:
- 執行環境 (Execution Context): ChatGPT 網頁版無法讀取你 D 槽裡的 PDF,也無法幫你在你的 Mac 上跑 Python 腳本。但 OpenClaw 運行在你的 Docker 容器裡,它可以直接存取你的檔案系統(File System)和執行 Shell 指令。
- 數據主權 (Data Sovereignty): 雖然推理是遠端的,但「技能 (Skills)」執行的結果(例如寫好的程式碼、整理好的筆記)是直接存在你電腦硬碟裡,而不是存在雲端服務商的資料庫中。
3. 本質就是:MCP + Tool Use 的實作容器
MCP 和 SKILL 確實是它的核心靈魂:
- SKILLs (技能) = Tools: 它就是一個框架,讓 LLM 懂得如何呼叫你電腦裡的工具(例如:
web_search、file_read、run_script)。 - 整合平台: 它的價值在於把「通訊軟體 (Line/Slack)」+「大模型 API」+「本地工具」三者串接起來,省去你自己寫 Python 腳本去接 API 和 Webhook 的麻煩。
結論
OpenClaw 比較像是一個 「帶著 AI 大腦的遠端遙控器」,而不是一個「本地 AI 模型」。
- 如果你要的是「隱私絕對安全、斷網也能用」: 這不是你要的東西(除非你魔改它去接本地的 Ollama/LocalAI 接口,但官方教學主要引導使用付費 API)。
- 如果你要的是「能幫我操作電腦做事」: 那這就是它的強項。
一些可能的操作常見問題
# 用來看 config 檔內容
docker exec openclaw-openclaw-gateway-1 cat /home/node/.openclaw/openclaw.json

# 把檔案弄到 openclaw-openclaw-gateway-1 裡
docker cp 你要複製的檔案 openclaw-openclaw-gateway-1:/home/node/

# 用來找你的 token,你應該會看到類似 "token": "xxxxxx..." 的字串,那就是 Web 介面要求的 Token。
docker exec openclaw-openclaw-gateway-1 cat /home/node/.openclaw/openclaw.json | grep token

# 確認 TOKEN 值
docker compose exec openclaw-gateway env | grep OPENCLAW_GATEWAY_TOKEN
export OPENCLAW_GATEWAY_TOKEN=上面的值

# 執行特定程式
docker exec -it -u root openclaw-openclaw-gateway-1 bash -c "apt-get update && apt-get install XXX -y"

# 看看你的 openclaw-gateway 出啥問題
docker compose -f /home/tonton/openclaw/docker-compose.yml logs --tail 50 openclaw-gateway
docker compose logs -f openclaw-gateway

# 進到 docker 處理執行程式 (gog 的安裝)
docker exec -it -u root openclaw-openclaw-gateway-1 bash
curl -L https://github.com/steipete/gogcli/releases/download/v0.9.0/gogcli_0.9.0_linux_amd64.tar.gz | tar -xz -C /usr/local/bin && chmod +x /usr/local/bin/gog

# 安裝 gog 來使用 Gmail 跟 Calendar;Dockfile 裡的這行已經錯囉 !
https://github.com/openclaw/openclaw/blob/main/docs/platforms/hetzner.md?plain=1#L229

# 正確下載網址是這樣
https://github.com/steipete/gogcli/releases/tag/v0.9.0

# 或者直接下載,然後放進去 docker 裡,但這樣每次重啟就壞掉得重來了
docker cp gog openclaw-openclaw-gateway-1:/usr/local/bin/gog
docker exec -u root openclaw-openclaw-gateway-1 chmod +x /usr/local/bin/gog

# 進到 Docker 裡,看你的 Oauth 的 token 有無放進去
docker exec -it -u root openclaw-openclaw-gateway-1 bash
root@74c85ab431b0:/app# ls /home/node/.openclaw/workspace/credentials.json
/home/node/.openclaw/workspace/credentials.json

root@74c85ab431b0:/app# gog auth credentials /home/node/.openclaw/workspace/credentials.json
path    /home/node/.config/gogcli/credentials.json
client  default

# 點開那網址並把回傳網址貼上,理論上就可以搞定了 !
gog auth add 你的Mail --services gmail,calendar,drive,contacts,docs,sheets  --manual
Opening browser for authorization…

# 在Docker 容器裡沒有全域的 openclaw 指令,正確用法是透過 openclaw-cli 服務執行
docker compose run --rm openclaw-cli cron runs --id <jobId> --limit 50
docker compose run --rm openclaw-cli status
docker compose run --rm openclaw-cli doctor
最後的最後,補上一個目前個人運作起來最正常的 /home/node/.openclaw/openclaw.json
{
  "meta": {
    "lastTouchedVersion": "2026.1.30",
    "lastTouchedAt": "2026-02-02T20:55:34.860Z"
  },
  "auth": {
    "profiles": {
      "google:default": {
        "provider": "google",
        "mode": "api_key"
      }
    }
  },
  "agents": {
    "defaults": {
      "model": {
        "primary": "google/gemini-3-flash-preview"
      },
      "models": {
        "google/gemini-3-flash-preview": {
          "alias": "gemini-flash"
        }
      },
      "workspace": "/home/node/.openclaw/workspace",
      "compaction": {
        "mode": "safeguard"
      },
      "maxConcurrent": 4,
      "subagents": {
        "maxConcurrent": 8
      }
    }
  },
  "messages": {
    "ackReactionScope": "group-mentions"
  },
  "commands": {
    "native": "auto",
    "nativeSkills": "auto"
  },
  "hooks": {
    "enabled": true
  },
  "channels": {
    "line": {
      "enabled": true,
      "channelId": "2007251985",
      "channelAccessToken": "Line channel AccessToken",
      "channelSecret": "Line channel Secret",
      "groupPolicy": "open",
      "dmPolicy": "open",
      "allowFrom": [],
      "accounts": {}
    }
  },
  "gateway": {
    "port": 18789,
    "mode": "local",
    "bind": "lan",
    "controlUi": {
      "allowInsecureAuth": true
    },
    "auth": {
      "mode": "token",
      "token": "token"
    }
  },
  "plugins": {
    "entries": {
      "line": {
        "enabled": true
      }
    }
  },
  "tools": {
    "web": {
      "search": {
        "enabled": true,
        "apiKey": "apiKey"
      },
      "fetch": {
        "enabled": true
      }
    }
  },
  "wizard": {
    "lastRunAt": "2026-02-02T20:55:34.836Z",
    "lastRunVersion": "2026.1.30",
    "lastRunCommand": "configure",
    "lastRunMode": "local"
  }
}